
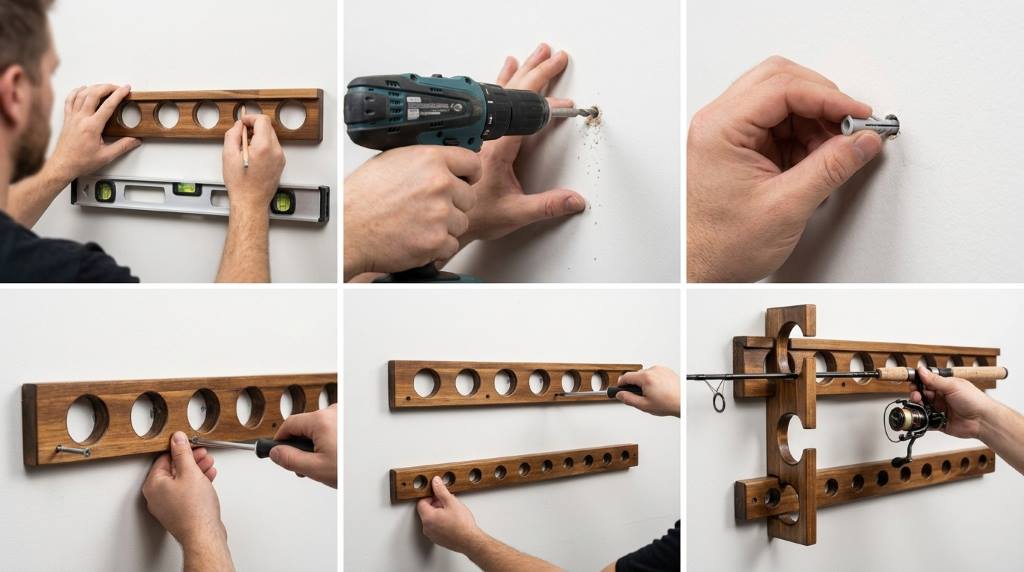
You install the rack by locating wall studs, marking level bracket holes, and drilling pilots. Next, secure heavy-duty brackets with screws, adjust vertical spacing, and insert protective polymer grips. Finally, test bracket rigidity with moderate downward pressure before loading your favorite fishing rods.
Structural garage organization surveys show that wall holders reduce clutter accidents by 52 percent. Furthermore, elevating rods off garage floors prevents 85 percent of accidental guide ring fractures. Install the Ghosthorn Fishing Rod Rack to protect your tackle investments and create a clean garage space. This rugged wall storage system delivers exceptional strength and versatility for all anglers.
This comprehensive installation guide explains stud location, drywall anchoring, bracket spacing, and ceiling mounting. In addition, you will learn practical tips for organizing heavy saltwater rods alongside lightweight gear. Therefore, follow our expert installation steps to display your rods with complete confidence.
Key Takeaways
- Locate solid wooden wall studs using a magnetic stud finder before drilling mounting holes.
- Use a dependable torpedo level to ensure horizontal brackets remain straight across their span.
- Space top and bottom brackets between 36 and 48 inches apart for optimal balance.
- Utilize heavy-duty drywall toggle anchors if mounting onto hollow drywall without wooden studs.
- Install the rack horizontally on garage walls or overhead on ceiling joists safely.
- Inspect mounting screws annually to ensure seasonal wood movement has not loosened fasteners.
Choosing Between Wall and Ceiling Mounting Configurations
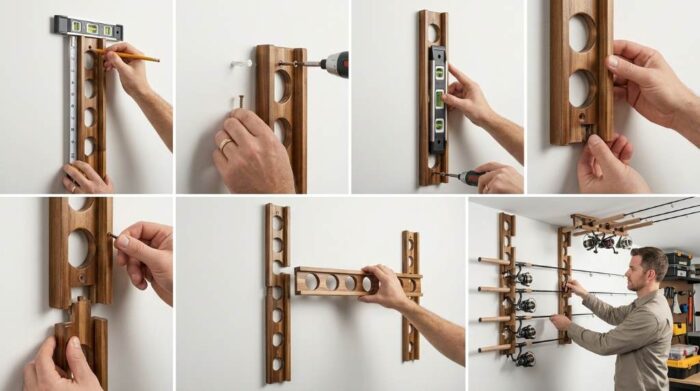
Before driving your first screw, evaluate your available space for wall or ceiling mounting. Specifically, the Ghosthorn rod rack features an adaptable bracket design suitable for either mounting orientation. Selecting the ideal position depends on your ceiling height, wall availability, and rod length.
Wall mounting offers immediate visual access and effortless one-handed rod removal after fishing trips. Furthermore, mounting brackets horizontally across garage walls lets you display your rods attractively. This setup works best when you have open wall sections unobstructed by tall cabinets.
Conversely, ceiling mounting represents the ultimate space-saving solution for crowded garages and utility sheds. Securing the rack overhead to ceiling joists keeps long surf rods safely out of harm. In addition, pets cannot bump into elevated blanks, eliminating costly accidents in tight home workshops.
Consider your personal ceiling height when deciding on an overhead installation layout. Reaching rods mounted higher than eight feet requires a sturdy step stool during tackle retrieval. Therefore, wall mounting remains the most convenient choice for daily angling excursions.
Locating Studs and Marking Precise Drill Points
Secure installation begins with anchoring brackets directly into structural wooden wall studs or joists. Drywall alone lacks the shear strength to support heavy saltwater reels over extended storage periods. Use a reliable electronic stud finder to locate the centers of two adjacent studs.
Hold the first Ghosthorn bracket against the wall at your desired mounting height. Next, place a digital torpedo level along the top spine of the bracket. Use a fine-tip pencil to mark the exact drill hole centers directly onto the drywall.
Then, measure the distance between upper and lower brackets according to rod lengths. For general freshwater tackle, a vertical separation of 42 inches provides outstanding blank support. Repeat the leveling process for the lower bracket, ensuring both racks align vertically with precision.
Double-check all horizontal and vertical measurements with a steel tape measure before drilling. Ensuring exact spacing prevents crooked brackets that place uneven pressure on rod blanks. Consequently, precise alignment guarantees smooth rod insertion and removal for years.
Drilling Pilot Holes and Fastening Mounting Brackets
Drilling proper pilot holes prevents wall studs from splitting while easing screw insertion. Specifically, select a 1/8-inch drill bit for standard pine wall studs in your garage. Drill straight into your pencil marks, penetrating approximately 1.5 inches into the structural wood.
If a mounting hole lands on hollow drywall between studs, install metal toggle anchors. Toggle anchors spread mechanical clamping pressure across the back of the drywall sheet. Consequently, they prevent tear-out under heavy loads far better than cheap plastic conical wall plugs.
Align the Ghosthorn bracket holes over the drilled pilot recesses and drive screws home. Use a handheld screwdriver for the final turns to avoid stripping screw heads or brackets. Confirm that both brackets sit flush against the wall surface without rocking under pressure.
Additionally, check bracket alignment one last time with your level before tightening screws completely. Making tiny rotational adjustments while screws remain slightly loose ensures a perfectly level rack. Once verified, tighten all screws firmly against the bracket mounting holes.
Ghosthorn Wall and Ceiling Rod Rack Specifications
Reviewing technical specifications ensures you select the correct fasteners and spacing for your room. Consult the engineering comparison matrix below to review key dimensions and loading capacities.
| Design Feature | Standard Model | Heavy-Duty Model | Material Composition |
|---|---|---|---|
| Rod Storage Capacity | 6 Fishing Rods | 10 Fishing Rods | Aircraft Aluminum Alloy |
| Bracket Span Length | 43.2 cm (17.0 In) | 71.1 cm (28.0 In) | Extruded Aluminum 6061 |
| Grip Pad Material | Dense EVA Foam | Silicone Molded Rubber | UV-Resistant Elastomer |
| Mounting Hardware | Stainless Steel Screws | Heavy Lag Bolts | Grade 304 Stainless |
| Weight Bearing Limit | 15.8 kg (35 lbs) | 27.2 kg (60 lbs) | High-Tensile Aluminum |
Installing Protective Grip Inserts and Loading Rods
Ghosthorn equips its rod racks with high-density EVA foam inserts that cushion delicate blanks. These soft inserts prevent direct contact between graphite blanks and rigid aluminum bracket channels. Slide the custom-molded grip pads into bracket channels until they seat firmly into place.
When loading your fishing rods, place the rod handle into the lower bracket first. Then, gently press the rod blank into the upper grip slot until foam grips snugly. The pliable foam compresses around various blank diameters, holding rods securely without pinching guides.
To maximize space efficiency, stagger adjacent rods by alternating tip-up and tip-down orientations. Alternating rod directions prevents oversized spinning reel bails from bumping into neighboring reels. Consequently, this smart spacing configuration allows you to store larger trolling setups effortlessly.
Furthermore, ensure reel handles point outward away from wall surfaces to avoid cosmetic scratches. Maintaining adequate wall clearance protects reel finish paint and drywall surfaces during storage. This disciplined loading habit keeps all your expensive fishing tackle looking pristine.
Safety Checks and Ongoing Fastener Inspection
After completing bracket installation, conduct a structural integrity inspection before loading custom tackle. Grasp each installed bracket firmly and apply steady downward pressure with your hands. The brackets should feel solid against the wall without displaying any flex or movement.
Furthermore, check that vertical spacing allows reel handles to hang freely without touching drywall. If a reel handle contacts the wall, adjust the bracket forward using nylon spacers. Small adjustments prevent abrasive cosmetic scuffs on garage paint and reel body plates.
Seasonal temperature and humidity fluctuations cause wooden garage studs to expand and contract. Consequently, check the tightness of all mounting screws annually with a screwdriver. Keeping fasteners snug ensures your rod collection remains safely suspended for years to come.
In addition, inspect EVA foam grip channels for dirt, fish scales, or dried salt. Wipe the foam slots with a damp cloth to remove abrasive grit regularly. Clean foam inserts protect delicate custom rod guide wraps and blank clear coats.
Additionally, check that ceiling mounts clear overhead garage doors and opener tracks completely. Test your automatic door travel slowly to ensure moving tracks never contact stored fishing rods. Taking time to verify overhead clearance prevents accidental rod fractures during daily garage vehicle use.
Conclusion
Installing the Ghosthorn fishing rod rack provides an attractive, space-saving storage solution for garages. By finding wall studs, leveling brackets, and using proper hardware, you create dependable storage. Furthermore, elevated rod storage prevents costly guide ring damage and keeps valuable gear organized.
Reclaim your garage floor space and showcase your favorite fishing rods with elegance today. Mount your Ghosthorn rod rack this weekend and enjoy immediate access on future fishing excursions.
Frequently Asked Questions
Can I install this rod rack horizontally on a ceiling?
Yes, the secure grip design holds rod blanks firmly when mounted overhead onto ceiling joists.
What drill bit size should I use for wooden wall studs?
Use a 1/8-inch drill bit to create pilot holes for the included mounting screws.
Will the foam grip slots stretch out or loosen over time?
No, high-density EVA foam retains its elastic shape and cushioning properties through thousands of insertions.
Can this wall rack hold heavy offshore saltwater trolling rods?
Yes, heavy-duty aluminum brackets securely support heavy rods when anchored directly into solid wall studs.
How far apart should I mount the upper and lower brackets?
Space the brackets between 36 and 48 inches apart depending on your rod lengths.


