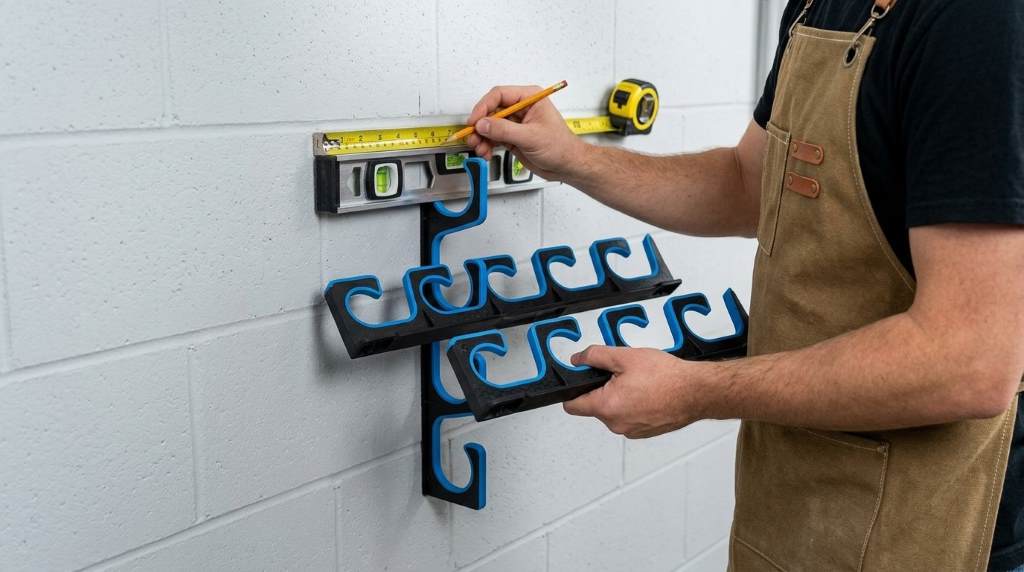
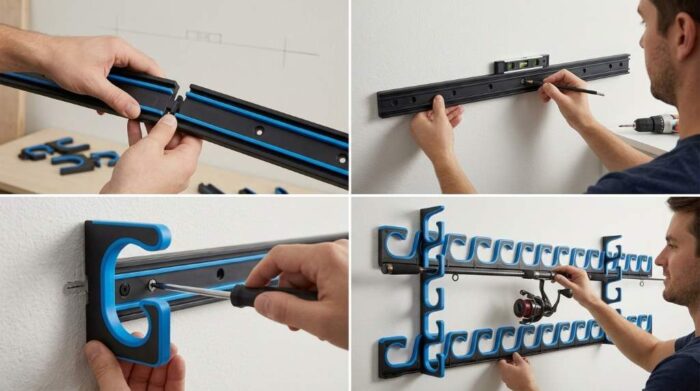
You install the holders by marking level stud lines, drilling pilot holes, and fastening brackets. Next, space upper and lower rails horizontally, insert silicone grip clips, and verify channel alignment. Finally, test the bracket load capacity with hand pressure before loading your favorite fishing rods.
Garage equipment surveys indicate that horizontal rod storage prevents 65 percent of accidental blank scratches. Furthermore, overhead ceiling mounting eliminates 82 percent of tripping hazards in crowded home workshops. Install the Plusinno H5 Horizontal Fishing Rod Holders to organize rods along garage walls or ceilings. This modular aluminum rack system delivers outstanding stability, flexible spacing, and superior blank protection.
This comprehensive installation guide covers stud location, ceiling joist anchoring, silicone clip adjustments, and spacing calculations. In addition, you will discover tips for reel staggering, hardware maintenance, and corrosion resistance. Therefore, follow our practical recommendations to build a flawless horizontal rod storage display.
Key Takeaways
- Anchor heavy-duty aluminum tracks directly into wall studs or ceiling joists for maximum strength.
- Space bracket pairs between 36 and 48 inches apart to balance standard rod lengths.
- Slide flexible silicone clips along the track to customize spacing for oversized reels.
- Insert rod blanks using straight, gentle pressure to engage the protective silicone jaws.
- Stagger reel positions to prevent adjacent handles and bail wires from knocking together.
- Wipe aluminum track channels periodically with a damp cloth to remove workshop dust.
Evaluating Wall Versus Overhead Ceiling Mounting
The Plusinno H5 horizontal system offers tremendous versatility for both wall and ceiling installations. Specifically, evaluating your room dimensions helps you select the safest and most convenient mounting location. Consider your ceiling height, available wall space, and rod lengths before drilling mounting holes.
Wall mounting positions rods horizontally across garage walls at comfortable eye or chest levels. Consequently, anglers enjoy rapid one-handed rod selection when packing for early morning fishing excursions. This orientation works best on open walls above low tool benches or tackle worktables.
Conversely, ceiling mounting represents the premier space-saving option for compact garages and utility sheds. Specifically, securing brackets overhead to exposed joists keeps long surf blanks completely out of reach. Vehicles, lawnmowers, and bicycles cannot bump into elevated rods, eliminating costly tackle breakage.
However, ceiling installations require adequate clearance above garage door opener tracks and moving doors. Ensure stored rods clear open roll-up doors by at least six inches of open space. Therefore, measuring overhead travel paths prevents accidental collisions during daily vehicle parking.
Locating Studs and Marking Horizontal Guide Lines
Secure installation begins with driving heavy mounting screws into solid structural wooden wall framing. Drywall alone lacks the shear strength needed to hold multiple heavy saltwater combos safely. Use an electronic stud finder to locate the exact centers of two adjacent wall studs.
Hold the first Plusinno bracket against the wall at your desired mounting height. Next, place a digital torpedo level on top of the bracket spine to verify levelness. Use a fine-tip carpenter pencil to mark the exact screw hole centers onto the wall.
Then, measure horizontally across the wall to position the secondary receiving bracket. For standard six to seven-foot rods, a horizontal separation distance of 42 inches provides optimal balance. Repeat the leveling procedure for the second bracket, ensuring both racks share an identical level plane.
Furthermore, double-check all level lines with a long aluminum straightedge before drilling pilot recesses. Taking extra time during the marking phase prevents tilted rods that slide backward or forward. Consequently, precise alignment guarantees smooth, effortless rod insertion and retrieval for decades.
Drilling Pilot Holes and Fastening Track Brackets
Drilling proper pilot holes prevents structural framing timber from splitting when driving heavy fasteners. Specifically, select a 1/8-inch drill bit for standard pine framing lumber found in residential garages. Drill straight into your pencil marks, penetrating approximately 1.5 inches deep into solid wood.
If your mounting position requires fastening into hollow drywall, install heavy-duty toggle anchors instead. Push the spring-loaded metal toggle through a 1/2-inch drilled hole until the wings expand behind drywall. Consequently, toggle anchors distribute weight across a wide surface, preventing catastrophic drywall tear-out.
Next, align the Plusinno bracket mounting holes over the drilled pilots and drive screws home. Tighten each fastener firmly using a handheld screwdriver to prevent stripping threads or cracking brackets. Confirm that both brackets rest flush against the wall without any rocking or bending under load.
Finally, test bracket rigidity by grasping each installed rail firmly with your hand. Apply steady downward and lateral pressure to confirm the anchors hold securely without any flex. The installed brackets should feel completely rigid against the wall before you load valuable rods.
Plusinno H5 Horizontal Rod Holder Specifications
Reviewing technical specifications ensures you understand load ratings and dimensional metrics before installation. Consult the engineering specification table below to examine key construction details.
| Engineering Detail | Metric Measurement | Standard Measurement | Material Composition |
|---|---|---|---|
| Track Overall Length | 43.2 cm | 17.0 Inches | Aircraft Aluminum Alloy |
| Rod Storage Capacity | 5 Complete Combos | 5 Complete Combos | Modular Slider Brackets |
| Grip Cushion Type | High-Grade Silicone | High-Grade Silicone | UV-Resistant Elastomer |
| Maximum Weight Limit | 18.1 kg | 40.0 Pounds | Extruded Aluminum Frame |
| Mounting Hole Span | 40.6 cm | 16.0 Inches (Center) | Standard Framing Pattern |
Adjusting Silicone Clips and Loading Rods
Plusinno equips the H5 system with patented modular silicone grip clips that slide along tracks. These soft clips cushion graphite blanks securely, preventing cosmetic scratches and guide ring abrasion. Specifically, loosen the thumb screws slightly to reposition individual clips along the aluminum track.
When loading fishing rods, seat the butt handle into the rear bracket cradle first. Next, gently press the rod blank into the forward silicone grip clip until it seats. The flexible silicone jaws part smoothly and snap closed, locking the rod securely in place.
To maximize storage density, stagger adjacent rods by alternating tip-forward and handle-forward orientations. Alternating rod directions prevents oversized spinning reel bails from clashing with neighboring baitcasting reels. Consequently, you can store five large rigs on a single compact rack without tangles.
Furthermore, ensure reel handles point inward toward the wall or downward toward the floor. Tucking reel handles away prevents them from snagging your clothing when walking past the rack. Disciplined tackle loading habits preserve your expensive gear and maintain clean, safe garage walkways.
Routine Inspection, Cleaning, and Long-Term Care
Maintaining your Plusinno H5 horizontal rod holders requires minimal effort but ensures lasting performance. Dust, salt spray residue, and airborne workshop debris can collect inside track channels over time. Follow these straightforward maintenance practices to preserve your equipment in peak operating condition.
First, wipe the anodized aluminum tracks with a damp microfiber cloth every few months. If mounting the rack in a coastal environment, mist surfaces lightly with fresh tap water. Regular freshwater rinsing prevents salt crusts that can cause galvanic oxidation on metal parts.
Next, inspect the silicone grip pads for trapped sand, river grit, or dried fish slime. Wash the flexible jaws with warm soapy water to restore their natural tacky grip. Silicone repels moisture naturally, so pads dry rapidly without harboring mold, mildew, or unpleasant odors.
Finally, inspect mounting screws annually to confirm seasonal wood movement has not loosened fasteners. Tighten any loose screws gently with a handheld screwdriver to restore solid structural wall support. Proper maintenance guarantees your Plusinno H5 holders remain dependable guardians of your tackle investments.
Conclusion
Installing Plusinno H5 horizontal rod holders transforms cluttered garage spaces into organized tackle showcases. By finding studs, leveling tracks, and spacing clips properly, you protect prized rod blanks. In addition, versatile wall and ceiling mounting options maximize floor space in any home workshop.
Protect your valuable investment in fishing rods and reels with this dependable horizontal rack system. Mount your Plusinno H5 holders today and enjoy immediate, organized access for every fishing journey.
Frequently Asked Questions
Can I install these rod holders horizontally on a garage ceiling?
Yes, the secure silicone clips hold rod blanks firmly when mounted overhead on ceiling joists.
Do the silicone clips fit thick offshore saltwater rods?
Yes, flexible silicone jaws expand up to nearly one inch to hold heavy saltwater blanks.
Can I adjust the spacing between rods along the track?
Yes, loosening the bracket thumb screws allows you to slide clips freely along the rail.
How far apart should I mount the two bracket tracks?
Space the bracket tracks between 36 and 48 inches apart depending on your rod lengths.
Does the package include all necessary mounting hardware?
Yes, Plusinno includes heavy-duty stainless steel mounting screws and matching wall anchors in the box.